This is less of a snippet and more of a reminder for something I look up often. When creating SVG files in Adobe Illustrator, there are a couple of different methods for exporting the files. Both methods include a handful of options, some of which I totally forget what they mean and what to select.
Method 1: Save As…
You probably wouldn’t use this method to save SVG for use on the web. This is largely for saving a master document. In fact, you might wanna just save in the Illustrator format directly. You’d use some of the other export options to export for the web.
The most common way to save a file as SVG in Adobe Illustrator is to choose the File > Save As... option from the main menu.
Illustrator will fire up a dialog window asking you what to name the file and where to save it. More importantly, it also asks what type of file to save as which, in this case is SVG. Not SVG Compressed (svgz). Plain ol’ SVG.
Click the Save button and another set of options will appear. This is where my memory tends to fail me and I have to scour the web for answers. Here is a screenshot of a perfectly optimal way to save an SVG file in Adobe Illustrator.

- SVG Profiles: This sets the XML document type on the opening
<svg>tag. SVG 1.1 is the latest version, covers the most wide-ranging support and is likely the most suitable option. Everything else is either an older version or a subset of SVG 1.1 and I have yet to run into an issue when selecting it. - Fonts > Type: Selecting “Convert to Outline” will ensure that any typed text in the file is exported are vector paths rather than glyphs. Glyphs have a chance of not being rendered but vector paths are always a big thumbs up.
- Options > Image Location: If raster images (read: JPG, PNG, GIF) are used in the file, then we’ll want to select the “Link” option. Otherwise, the raster image will be embedded in the file and that sucks the performance benefits right out of the SVG by increasing the file size to include those extra assets. Better to reference them as links and be sure to include those source files in the same directory as the SVG file.
- Options > Image Location > Preserve Illustrator Editing Capabilities: This one has a massive impact on the output of the SVG file. Since you’re probably saving a “master” copy here, not intended for us on the web, you’d leave this checked. This will preserve Illustrator proprietary things (like guides) for the next time you open the file. Unchecked will mean things like that will be stripped away and lost.
- Advanced Options > CSS Properties: I select “Presentational Attributes” for this one because it places properties (e.g. fills, strokes and such) at the lowest level of specificity. For example
<path stroke="black" stroke-width="2" ... />. This styles the element, but is very easy to override in CSS. - Advanced Options > Decimal Places: If you’ve browsed the code for a
<path>, then you know that the values specifying those shapes can be super precise. Many times, however, those are too precise and add to the overall size of the SVG file. Since you’re likely saving a master file here, you can keep this fairly high, because file size isn’t much of a concern. - Advanced Options > Encoding: I’m not a buff on UTF encoding, but leaving this at “Unicode UTF-8” does ensure backwards compatibility. Also, UTF-8 files sizes tend to be smaller than UTF-16, so that is a win in and of itself.
- Advanced Options > Responsive: Leaving this unchecked will set fixed
heightandwidthattributes on the SVG. I check this option because it lets me set those attributes either in the code or in the CSS.
Method 2: Export As
Another way to get SVG from Adobe Illustrator is to choose the File > Export > Export As... option from the main menu. However, there is a second way to get there by using the Actions panel in the Illustrator workspace.
This option is ideal if you know you are going to use this file directly on the web and do not plan on tinkering with the design later. It provides way fewer settings and a couple of options that allow the file to optimize the file further for better performance. In fact, it’s best practice to do this on a copy of the file rather than on the master file itself so there is one version that can be opened and edited later in Illustrator and another that is more suited for serving on a production website.
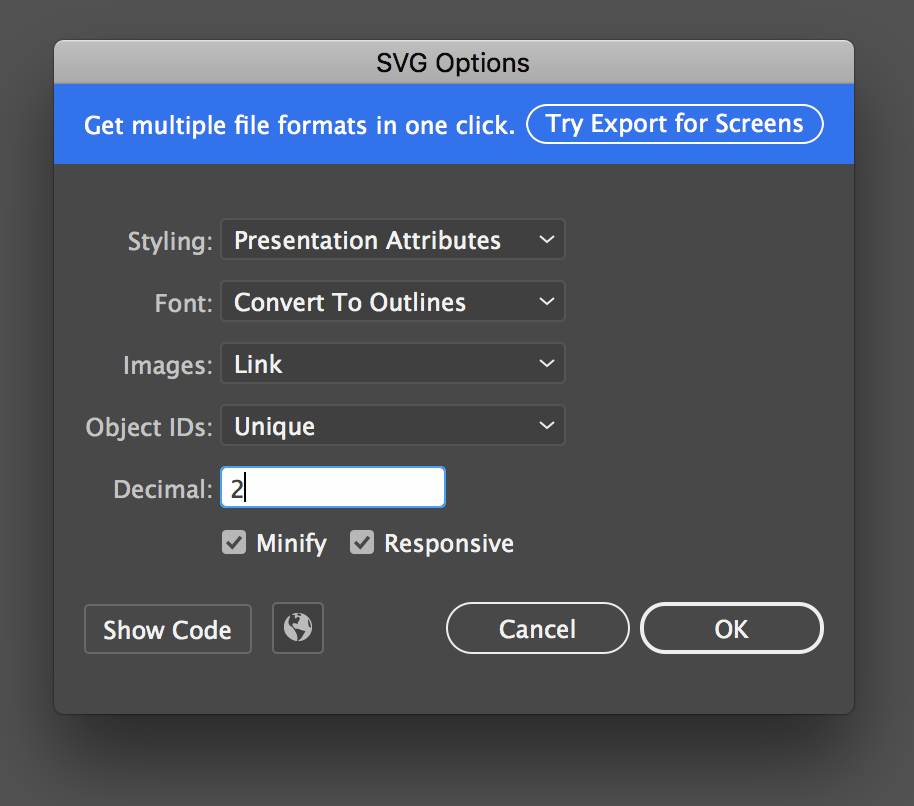
- Styling: We covered this one earlier in the Method 1 settings, but I choose “Presentation Attributes” here because it’s a way to organize properties on the highest level attributes. This adds order to the markup, flexibility in our ability to style the subsequent attributes with CSS, and often leads to smaller file sizes.
- Font: This is another one we covered above, but choosing “Convert to Outlines” swaps glyphs for vector paths for characters which ensures text renders correctly.
- Images: This is yet another one we covered above, but choosing “Link” will prevent embed raster images from being packaged in the SVG, which makes the file a lot bigger.
- Object IDs: This setting gives Illustrator marching orders for how to name IDs in the markup. You can tell it to name IDs based on how the layers are named in the file.
- Decimal: Fewer decimals in the code mean smaller file sizes. Setting this to
1is ideal and OK in many cases and won’t have a noticeable difference in the design, but2is typically safe. Either way, it’s worth checking how the SVG is rendered. - Minify: Yes, please! This crunches the code down to reduce whitespace and increase web performance much like minifying CSS.
- Responsive: Exactly like the first method, selecting this option is ideal because fixed
heightandwidthattributes would otherwise be placed on the SVG.

Nice post, i’m reading it very late :) I’m trying to export svg files with the stroke and stroke-width attributes leaving the “Presentation Attributes” option selected, but it only exports the path without the stroke, it’s a problem with some js libraries that works with that attributes, what do you recommend me to do? Cheers, and excelent post.
FYI: Not sure if others run into this. We use SVG images in online help. We also localize text, and we need to use the “Output fewer elements. For this reason alone, we are forced to Save As, as the export option does not let us do this. Our text elements are then broken into multiple text paths and blows up our translation capabilities. Is there any way to limit elements during EXPORT?
Hi @Leith Wolfe, have you found a solution to your problem? We are having a similar issue, when we save the SVG, we are loosing the localized texts (i.e. the switch tag is lost).