I get a fair number of questions about how I record the screencasts, so I thought I’d do a post on it that is both of interest now and that I can refer people to later.
Hardware
Mac

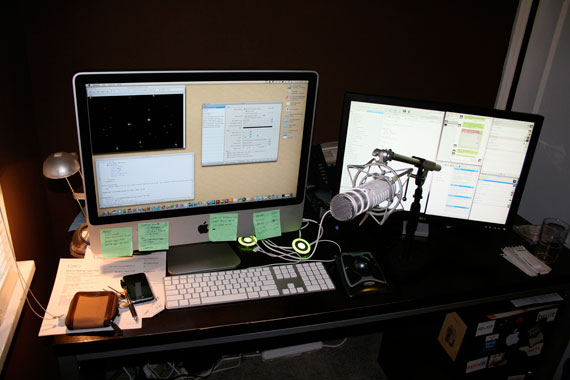
I have a 24″ iMac and a second 24″ monitor to the right. Screen real estate is valuable to me as a designer/coder/media consumer/telecommuter. Each of those hats I wear requires a bunch of open windows and sometimes I feel like I still don’t have enough. The second monitor is very handy in screencasting as we’ll see later.
Rode Podcaster

The iMac has a built-in mic, which is fine for quick Skype chats, but just doesn’t cut the mustard for quality for a screencast. Obviously my screencasts aren’t super-professional edited productions. My version of an intro is having a special desktop wallpaper! But, if you are going to listen to me talk for 20-60 minutes, sound quality is a big deal.
I have a Rode Podcaster microphone, which does a great job. I have a shock mount for it, which attaches to a little mini boom-stand I set on my desk. This allow me to get my mouth right up on the mic without needing to use my hands.
This is what the setup looks like:
Software
iShowU
To record the screen and sound, I use iShowU. It’s dead simple. I really like it. All the options you need, none of the confusion.
Stomp

ShinyWhiteBox, the makers of iShowU, make a companion product for compressing video called Stomp. Also very nice and dead simple to use. I believe they have package deals if you buy both.
Adobe Flash CS3 Video Encoder

I use this to convert into Flash video format (.flv) for display on the web.
The Process
1. Change screen resolution
The first thing I do is change the resolution of my main monitor down to 1024×768 and set my custom wallpaper. I like just showing my entire screen, dock and menu and all. In a sense, it might be a little distracting, but I like people to see that this is my exact real working environment. I don’t have some pretty sanitized sand box I’m doing this stuff in, this is real every-day coding.
2. Get hardware set up
As you can see in the picture above, I kinda push my second monitor out of the way and get my microphone set up in a comfortable position. Then I plug it into a USB port on the computer itself. I’ve tried keeping it plugged in all the time to my USB hub, but I get WAY lower volume out of it that way. This mic needs power, and it needs a direct input to get it.
The room around you is also kind of “hardware”. I get myself a glass of water, shut the door to the room, make sure the neighbor isn’t mowing the lawn, that kind of thing.
3. Get software set up
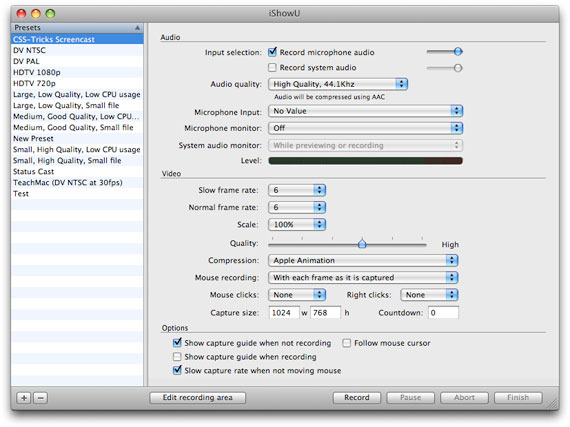
I quit every bit of software that I’m not intending to use in the screencast, leaving open only the important stuff. Usually, Photoshop, Coda/Textmate and iShowU. I verify all the settings in iShowU. At this point, the second monitor is already useful, as I can keep that window open on the second monitor keeping my main work area clean.
My settings for iShowU:
- Record Microphone Audio (full volume)
- High Quality Audio
- Microphone Input: Rode Podcaster (and check and make sure levels are nice and high, sometimes have to pop over to System Preferences and make sure input volume is good)
- Slow frame rate: 6
- Normal frame rate: 6
- Quality: 4th tick mark, leaning toward High
- Compression: Apple Animation
- Set recording area to the entire main screen (1024×768)
Record
Hopefully by this time, I have gone through in my head a few times how I hope this thing to go down. Main points I want to make, what the final product will be, minor details, where the advertising segments are going to be if there are any, etc. When I’m all ready, I press record and just go for it. A lot of times I can get it done in one take, but if I need a break, I just go over and press “Finish” on iShowU and start up again when I’m ready. If a majorly blunder (minor blunders I just leave in as I think it adds another element of realism), I just hit “Abort” and do that segment over.
Post Process
The first then I do when I’m finished is make a folder called “RAW”, put all the movie files in there, and make a duplicate. That way no matter what I do with the second copy of files, I always have the original recordings to go back to.
If there are multiple segments, I stitch them together in Quicktime Pro. All I do is open the first one and move the scrubber point to the end of the video. Then open the second, select all, cut, and paste into the first video. Repeat for all the rest of the segments. This is a peculiar thing in Quicktime Pro… After doing this, the file size of the #1 video you paste into doesn’t change file size (like you would think it would). I’m pretty sure it just kind of “virtually” stitches these files together, so DO NOT delete those other ones.
In my particular process, my next step is to use Stomp to create two different versions. First, I use the built in setting to create the .M4V file for the subscribers. This a very high quality version, works great on AppleTV and in iTunes. The .M4V ends up being 960 x 760px. I would just shoot at that size, but I like the little extra screen real estate and the scaling down doesn’t seem to effect quality much. Second, I make a .MOV file that I scale down to 800 x 600px. This is what I THEN convert into a Flash (.FLV) file for the web. I find that if I do my scale-down conversion in Stomp and then convert to Flash, I get MUCH higher quality than having the Flash Video Converter do the scale-down. The Flash video is still worse quality and higher file size, but it’s not too bad, and is way more compatible for people on the web than Quicktime embeds.
Uploading and Embedding
So now I have my two versions that I offer, the .M4V and the .FLV. The kind folks at IGN host my videos for me, so I upload them there. Video is pretty bandwidth-intensive, so I wanted to keep it off my main server. If you think your server can handle it, you can use that. Otherwise, Amazon S3 has pretty cheap hosting. I have a tutorial on setting up and hosting a file on S3.
Now I create the web page that will be the permanent home for the screencast, and will display the Flash Video. I use the JW FLV Player, which I think is a fine player. I use SWFObject to embed the player on the page. This keeps your code standards-complient and offers a TON of other advantages, which I go over in detail here. This page not only displays the video itself, but the title of the video, a short description, links from the video itself, and a link to download the higher quality version (for free!).
Creating the RSS feed entry
I offer an RSS feed for the videos, which is what the .M4V file is for. This feed needs to serve double-duty. One, be a valid RSS feed for people to subscribe to in whatever feed reader they wish. At the moment, all that feed contains is a title and a link to download the video, nothing fancy. Two, the feed needs to be iTunes-Compliant, because the screencast also appears in the iTunes Store podcasting area. This means adding a bunch of extra tags in the XML just for that. This is what an XML entry looks like for a screencast:
<item>
	<title>#35: Intro to jQuery 2</title>

	<link>https://css-tricks.com/videos/css-tricks-video-35.php</link>

	<itunes:author>CSS-Tricks</itunes:author>

	<itunes:subtitle>Intro to jQuery 2</itunes:subtitle>

	<itunes:summary>Starting off where we left off last time, we continue exploring the possibilities of jQuery. We revisit some of the old functions and make them do some smarter things. We explore a simple variable and an IF/ELSE statement. Then we look at the AJAX-y .load() function, the CSS function, and then finish off by writing out own custom function and going over how that layer of abstraction can help us keep our code clean. Semantics counts in JavaScript too!</itunes:summary>

	<enclosure url="http://vnfiles.ign.com/ects/css-tricks/VideoCast-35.m4v" length="69494950" type="video/mpeg"/>

	<pubDate>Thur, Sep 11 2008 12:00:00 GMT</pubDate>

	<itunes:duration>24:55</itunes:duration>

	<itunes:keywords>css, web design, html, tutorial</itunes:keywords>
</item>
I have to write all this by hand, because I’ve never found a good tool to do this for me in just this perfect format. I may do a screencast eventually on hand-writing RSS XML files…
So that’s about it! That’s what I do every week to record these screencasts. It’s a good amount of work but it goes pretty quick now that I’ve got my workflow all figured out. They aren’t masterpieces by any means, but they do seem to genuinely help some people and I get a kick out of it so I definitely plan to keep doing it.
Honorable Mentions
Sorry, I can’t help with PC suggestions as I have zero experience there. I have heard Camtasia Studio is good though.
Although not a part of my current screencast workflow, VisualHub is a badass video conversion tool that I use often for other video-related projects.
If you need mouse-highlighting, click-highlighting, and a keystroke-shower, Mousepose is excellent.
In many of my screencasts, I use Coda. Coda is amazing for development, and works great for the screencast because it shows the file structure of the project as well as the text editor.

Wow, that Rode Podcaster is awesome! You should donate it to me :P .
Just kidding ofcourse, but seriously, I think that is the key to your succes of videocasting ;) .
Thanks for sharing the information!
Wink is a great program for tutorials on windows and linux. I’ve never added audio to it, but it has the capability.
Great outline of your process. One can always get new ideas when hearing how other people do it =)
That was a very informative post, thanks! And near perfect timing for what I needed too.
I’d be quite interested in at least a post on hand-rolling RSS items as well.
Thanks for putting the time you do into this site Chris, it’s truly a wonderful resource and I’ve learned a ton of useful stuff.
Awesome Chris! Thanks! :)
I’m using Windows and yes I would say that Camtasia is the best.
Gotta get myself one of thos microphones!
Thanks for the outline, I listen to your podcast, and have found it very helpful. Keep up the great work.
Thank you Thank you. I think he created this article because I have been emailing him question after question about how to do this.
Chris you rocks. I have never seen a person go out of their way for others like this.
nice setup.
You should try Screenflow ( http://www.flip4mac.com/screenflow.htm ) It’s very cool and simple, you can capture your isight camera during screen capture and it has a built-in video editor that you can do lots of stuff like zoom and highlight window.
I Have found that QuickTime pro can come in handy for simple editing tasks. Not sure yest if it is worth the amount I paid. I guess time will tell.
Thanks again Chris
I’ll echo Rodrigo and recommend trying out Screenflow. Vara, the company that designed it (Telestream bought them like two or three weeks ago) won 2 Apple Design Awards for the product and they were totally, totally deserved. Both myself and my fellow TUAWer Brett Terpstra (blog.circlesixdesign.com) are gaga in love with the app.
The big advantage, IMO, is that it does full screen capture, has a great editor (so you can resize to 1024×768 or whatever you want AFTER capturing) and exports/optimizes the file size all in the same program — with pretty kickass results.
For me anyway, it is as close as you can get to Camtasia Studio on the Mac.
Thanks for sharing your setup – very nice!
Great write up, thanks!
I bought ScreenFlow a while ago and I am also totally amazed, great product.
For this current workflow, I’m pretty much happy the way it is. If I had more time to dedicate, I think I’d go the ScreenFlow route. Not that it’s way more complicated or anything, but there is post-processing that needs to be done and right now I do zero of that.
I seriously wish I could sink all day into these screencasts, as they are pretty fun to do, but I usually only have a few hours to commit to it.
Hi Chris,
you should have a look at Feeder (http://reinventedsoftware.com/feeder/). It’s a tool for creating, editing and updating RSS-Feeds, maybe it will save you a little bit of time.
Greetings
I bought the Samson CO1U USB Condenser Mic podcasting kit, which is a great product. Since I work on a PC (yeah I know, I should change) it comes with it’s own podcasting software, which really helps you get up and running quickly. Oh, and it comes in a shiny metal carry-case along with desktop stand, shock-mount and 2m USB cable.
Adobe Captivate may also need an honourable mention, although the jury is still out whether it is better than Camtasia, or vice versa.
Great article Chris! Everytime I read a good article by you, I just feel like coding something ;)
Nice overall set up and review. This really helps with what I am trying to do. I recently purchased an Alesis USB microphone that I’m fairly happy with, although the mic-stand leaves a bit to be desired. I have been using SnapZPro and have been very happy with the overall quality. I convert all of my QT files to flvs and they seem to compress and stream quite well.
Thanks for the overview Chris.
~Mike
I also am WIN user and as I looked over those programs, Camtasia is the best solution for me. I really love Your workspace – looks serious! Thanks for sharing Your screencasting setup!
I have been enjoying your screen casts for some time now and have always wondered how it was that your voice was so clear. wicked setup you’ve got there! thanks mate, keep up the good work.
Chris — that’s a good point. Oh, if I had the time, I too would whip up post-macros of sorts to automatically run everything that needs to be run. I also understand and respect using the setup that works for you. I’m uber-jealous of your 24″ iMac! My set-up is pretty similar (sans nice microphone, I have a $20 Logitech) and with a Black MacBook and 22″ LCD in place of the 24″ Goddess of iMacdom.
Here’s a good site on screencasting, there’s posts about Windows, Mac, & Linux setups.
MyScreenCast.com
Don’t worry Chris, i’m not jealous of your setup one bit. Nope not one bit…
Dual Screens Reeally really help when screencasting, all the pro’s use them. Another hint for everyone planning to screencast is write a script! estimate a time for the video and try to stick to it.
A good quality presentation is worth watching. I’m a Windows Vista user and whenever i record a screencast; i do so using Camtasia Studio, it’s a great application for Windows Screen Recording.
Wow, 2x24inch, that must be awesome to work on. I think I got something to wish for again ;) Although I’m very happy with my 20inch screen :)
I don’t have a Mac but have used Camtasia quite a bit for screen recording in Windows and it does the job really well
Spot on!
I’ve bought and used many different USB and traditional mics and I think the Røde Podcaster is the highest quality USB mic out there. Most USB mics are too quiet and end up introducing a ton of environmental noise as you crank up the volume to a decent level.
I bought a half-dozen for my screencasting authors. BSW also makes a custom pop filter for it:
http://bswusa.com/proditem.asp?item=REPOP
I managed to pick up 3 at BSW for $160 last month, but they seem to be back up to about $230 now.
Finally, the Levelator is a simple app to even out the volume levels in a recording.
@Geoffrey: I should pick up one of those pop filters, thats a good idea. I currently use nothing.
What little I know about screencasting I learned from Peepcode, so thanks =)
What are your file sizes for the videos you post? I always have a hard time determining if a video is within an acceptable file size.
Thanks again .::.