As I was using Photoshop to resize my eleven billionth image, it occurred to me I should probably simplify this process. AppleScript, perhaps? Photoshop scripts? Some already existing little app? A little pontification on Twitter resulted in a number of suggestions to try OS X’s Automator. Turns out it’s a pretty easy thing to do, at least in a limited way.
Open Automator, then…
1. Make a Service
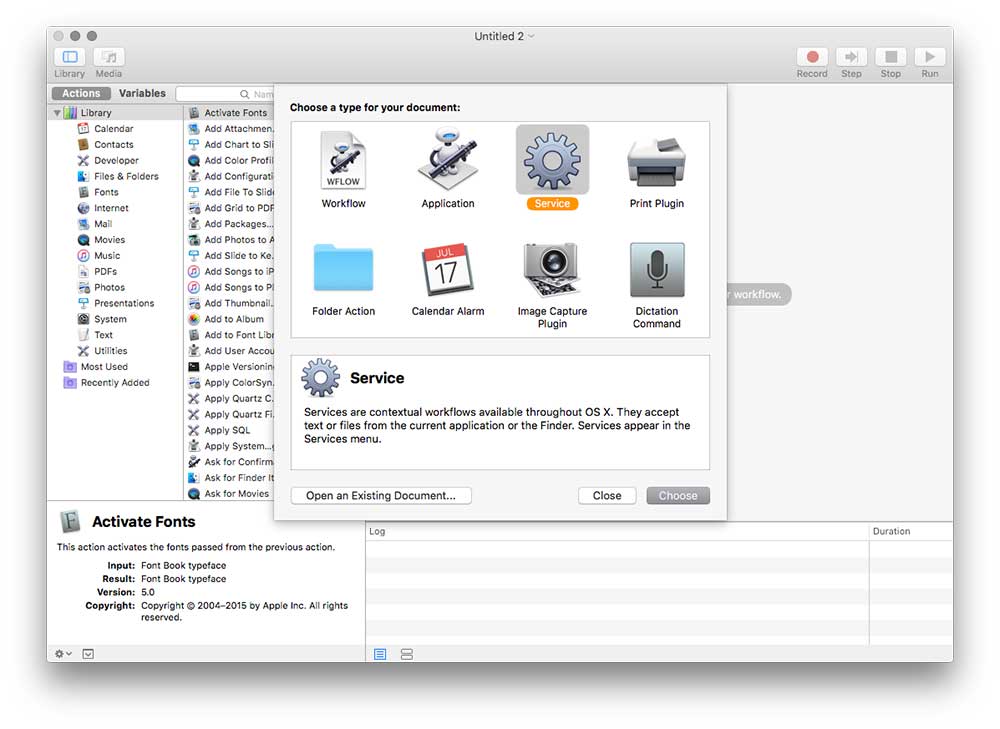
This is really up to you. You might prefer an app that you can drag things onto. Or a hot folder you can just drop things into. I like services since I can use them from the context menu anywhere.
2. Add “Scale Images” Action
It’s under “Photos”.

It will ask if you want to make a copy of the image or not. You probably do, so you can keep the original in case it doesn’t turn out how you want.

3. Add “Open Finder Items” Action
Open it with ImageOptim. In my case I’m scaling the images for the web, so of course I want them to be as optimized as they can.

4. Save It
I like calling it something super obvious (to me), like simply “500” or whatever the max size of the scaling is.

5. Done! Now it’s available as a service for any file in the Finder no matter where it is.

This is pretty rudimentary
- It has zero logic. So if you drop a 437px image into a service that scales to 1000px, it’ll scale up which you almost certainly don’t want.
- It keeps whatever format it’s currently in. Perhaps your PNG makes more sense as a JPG, this can’t help.
- It not always the greatest quality. I might look into attempting an Acorn or Photoshop thing instead since they seem to keep quality higher.
Would love to hear about your photo resizing workflows.
Interesting approach. But it seems to me much easier and expeted-result-promissing to use any of hundreds apps available.
Is there a list of those 100 apps? Is there a list of good ones, meaning feel like they are actively developed and work well and are rated well? I wasn’t finding a whole lot, and some of the dedicated apps I found felt like they were making the job harder rather than easier.
Better solution:
use Adobe Bridge > Go to folder with images
Then Tools > Photoshop > Image Processor
Why better? Does that mean every image I want to resize I have to add to Bridge first?
You can access this from within PS also, I forget where (not at the computer). I automate with Photoshop Actions that I then make into droplets, so all I need to do is drag and drop a folder or image onto the droplet and voila!
*if you have photoshop ;)
No. Bridge is like a file browser.
And it is “smart” it won’t scale up ur 500×500 images up to 1000×1000 if you set so. 1000×1000 are for example the maxima of width and height, if image is smaller it won’t scale down, and if only one side is bigger the aspect ratio is of course kept.
Also via the Bridge method you can put the wanted jped quality in so fast and easy scaling down of many images with photoshops build-in engine
cd folder-width-imagessips --resampleWidth 600 *.jpg(resizes images to 600px wide, retaining aspect ratio)sips --resampleHeight 600 *.png(resizes images to 600px tall, retaining aspect ratio).More: http://www.ainotenshi.org/818/resizing-images-using-the-command-line
Grunt when in workflow OR
chris’ sip-thing + pngquant/jpegoptim :)
I’m with you. I use a bash alias so I don’t have to type so much.
To prevent image UPsizing, you can use the
-Zflag, seeman sipsYou can also use spotlight (
mdfindin terminal-land) to only resize images over a certain size, for example 800px wide / tall:mdfind -0 -onlyin . "kMDItemPixelHeight > 800 || kMDItemPixelWidth > 800" | xargs -0 sips -Z 800I tend to use gulp on a per project basis, but most of my projects will use gulp-imagemin for optimising and gulp-image-resize for any scaling purposes.
gulp-image-resize has functionality to automatically handle width, height, cropping (with crop origin), image quality, file format, allowing or denying upscaling, applying image filters or sharpening of images.
set it up with gulp-watch and it’s a fire and forget solution which does everything in the background, so I don’t have to.
That’s pretty cool.
Does that mean that whenever you restart your computer though you have to open a terminal window and cd to that directory and fire up Gulp though? Not that that’s out of the question, but I know myself and I won’t do it. My goal was EASY EASY EASY.
And also not related to any particular web project. More like rando images laying around I want to use in a blog post.
Personally I only need to run gulp when I am work on a project, so it’s minimal fuss to run it from an IDE, although you could probably start a gulp watch with a bash script from automator.
I think for your needs, you could probably use an Automator service to run gulp in much the same way, just include yargs to tell it what image size or file type you want to use.
Fotosizer, for pc. http://www.fotosizer.com/ freeish nagware.
sips + ImagOptim
:-)
Xnconvert works really well imo.
You can also just use Photoshop’s image processor.
File > Scripts > Image Processor
Also has the added benefit of fine tuning out file type, size, compression, etc. and can even run actions on each image as part of the process.
I usually use ImageMagick, e.g.
mogrify. It works well, it’s fast and (as an added bonus) you won’t need to buy a Mac and switch to OS X to resize pictures. :) Quite the opposite, it’s in the repositories of any Linux distro.Hi Chris
Interesting take but as you mention, rudimentary and limited features.
I, for one, use photoshop by recording an action and make a droplet out of that action. And it’s a pretty simple process to set up:
– Open a sample image.
– Create a new action
– Click the record button
– Make the manipulation needed (that could be anything and everything you can do with photoshop)
– Save for web (note that the folder where you save will need to exist when using this action or you will get an error. Personally I have a “ready for web” folder on my desktop)
– Close the image (don’t save, just close)
– Stop recording your action
– Create a droplet from that action, save it and name it how ever you like. But usually meaningful names are better such “500px-portrait”… It helps when you have droplets.
And now you can just drag and drop hundreds of images at once if you want, and see the magic happening. Photoshop will open them all one by one and apply the same manipulation your recorded. You can still keep on working on something else while it runs.
Voila. It really takes 2 minutes to setup and speed up the process quite a lot. And it does not require to buy other software.
I have a couple of them for various size and orientation.
I hope it helps. Otherwise, I’m also curious to hears other solutions.
I also had tried a small and low cost app called photoResize. It’s also pretty good but lack the drag and drop automation feature I mention above.
Cheers
Love these kinds of obvious yet often unused techniques.
I take LOTS of screenshots on the Mac and they’re all saved as png’s. The good majority are better off as JPGs so I’ve got a similar script I’ve called PNG2JPG which works a treat.
you don’t take more shots than me. ;)
There needs to be a list of EZ workaround as CC mentioned.
And as much as I do reco Photoshop, there are quite a # of ppl out there who intact don’t own a copy. This is likely why images are so huge on sites. ;)
How about the Photoshop’s image processor?
File > Scripts > Image Processor
You can choose the folder to process, and specific width, height, and quality :)
In the past I’ve made something similar for some folks working with a CMS. In my script it also added a color profile which fixed this weird issue when we uploaded the images to the web. Was a great tool for them and they still use it today to quickly get images in good shape.
I’ve been doing pretty much the same for when I blog a dump of images. I’m starting with ~25-50mb tifs, edited in Photoshop but my workflow is converting and sequential renaming in a separate step.
My Automator steps are: Copy Finder Items, Change Type of Image (to jpg), Rename Finder Items: Make Sequential.
I used to resize images to ~1200px on the long side (for 3:2 from ~3800x2500px originals), but default Automator jpg compression in combination with resizing resulted in kinda shoddy images. (Changing jpg compression quality in Terminal made no difference.)
The resulting images from this are between 1.5 and 3.5mb with little jpg quality degradation, and most importantly it takes under 30 seconds per hundred images.
As much as I love command line, and having tried so many other ways of doing this, Automator has by far the least messing around, and most importantly it’s a process simple enough that my non-technically obsessed friends can use.
Use Gulp for minifying and scaling your images
Make an Automator Workflow that triggers ‘gulp watch’
Save the workflow as an application
Add your application to your login items in system preferences
I meant to ask Chris, does this not simply reduce dimensions, or does it optimize as well?? Meaning, if this has no logic, will it also increase the size of the 400px img sent to the 1000px service??
I like this as a quick way to kill email attachment size. Automator/ script are totally under utilized.
thx!
Fow Windows there’s IrfanView with a plethora of actions and options in batch mode. It’s a freeware, extremely lightweight image viewer.
I like to use Photoshop Automator Actions by Ben Long. They are well worth checking out and pretty simple to build complex, multi-step edits. I save them as droplets and can batch process tons at a time.
http://www.robotphotoshop.com/?page_id=8
It helps me to give tips to clarify the problem , it was explained in a elaborated form
, thanks for sharing.
I use Automator in combination with Paparazzi (which provides its own Automator actions) to take screenshots of responsive HTML builds. Paparazzi can capture an entire page of any length as one image, so it’s really handy.
I just open my page and go to Safari > Services > Responsive Screenshots, and bam, in a few seconds I have full-length screenshots of my page at 11 different breakpoints :-)
You can actually change the image type, there is an option for “Change Type of Images” in Automator under Photos tab.