The areas inside of regular ol’ HTML image maps support the title attribute which makes regular tooltips possible. Sometimes the default browser tooltips just don’t cut it, especially with their built in delays.
My favorite package for doing fancy tooltips is Prototip for the Prototype javascript framework. Prototip is free to download but requires a small licensing fee to use it on your domains. We will be using only a tiny fraction of what Prototip is capable of here, but hopefully this demo will open up the door of possibility should you need to do something like this.
Image Mapping the Image
Creating image maps is one of the few features I always pop open Dreamweaver to do. When you have an image selected on your page in Dreamweaver, you get little tools in order to draw the areas directly onto the image.
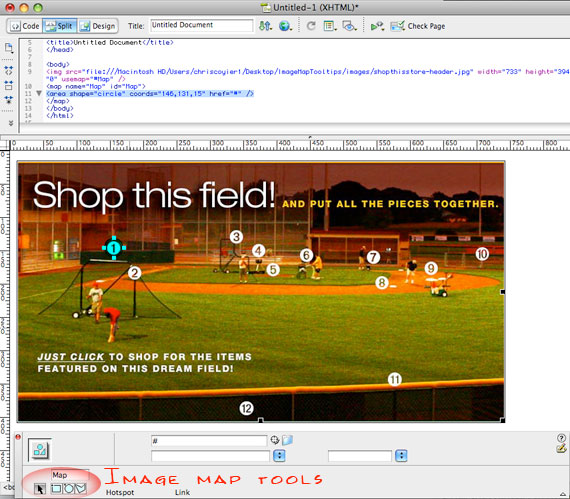
Can’t beat that for simplicity, trying to create areas without some kind of WYSIWYG editor would be a nightmare. Use this code as a starting point and then you can add unique ID’s to each area. You will need those unique ID’s to target with Prototip. Your final code will be something like this:
<img src="images/image.jpg" alt="image" usemap="#Map" />
<map name="Map" id="Map">
	<area shape="circle" coords="147,131,12" href="#" id="tooltip-1"/>
	<area shape="circle" coords="178,169,12" href="#" id="tooltip-2" />
</map>
Adding Prototip
You’ll need to include prototype and the prototip javascript files in your header, the use the new Tip function to create the tooltips for each ID.
<script type='text/javascript' src='js/prototype.js'></script>
<script type='text/javascript' src='js/scriptaculous.js?load=effects'></script>
<script type='text/javascript' src='js/prototip.js'></script>
<script type='text/javascript'>
	function init() {
	//<![CDATA[
		new Tip('tooltip-1', '<h3>Content for Tooltip 1</h3>', {title : '', className: 'silver', effect: 'slide', showOn: 'mousemove', hideOn: 'mouseout', fixed: true, hook:{target: 'topLeft', tip: 'bottomLeft'} });
		new Tip('tooltip-2', '<h3>Content for Tooltip 2</h3>', {title : '', className: 'silver', effect: 'slide', showOn: 'mousemove', hideOn: 'mouseout', fixed: true, hook:{target: 'topLeft', tip: 'bottomLeft'} });
	//]]>
	}
	Event.observe(window, 'load', init, false);
</script>
You can see in the code above some of the different options for Prototip. First of all, you target the ID and provide the HTML content for the tip. Then you can apply a class name, locational targeting, and change the events on which the tooltips trigger.
Tooltip CSS
This example uses very very basic styling.
.prototip 				{ position: absolute; }
.prototip .silver 			{ width: 733px; font-size: 1.8em; }
.prototip .silver .content 		{ text-align: center; padding: 10px 0; }
Most importantly, you need absolute positioning applied to the .prototip element so that your tips can pop up where they are supposed to and not affect the layout flow of the document. Then through your applied class you can do the rest of your styling. This allows you to have different styling for different tooltips which is a great feature. Notice in the example we have “silver” as the class name. This is what is applied in the javascript and what the CSS is targeting.
So — the usual disclaimer applies here. There are lots of ways to do this. You can create pure CSS tooltips if you’d like and I’m sure every major javascript framework has a solution of their own. My focus here to to show you can attach those tooltips to image maps through unique ID, which can be quite useful.

Thank’s alot for this nice howto. I’ll try it on weekend.
That’s very nice. Thanks for that.
That’s a nice way of mapping an image. Really makes it easy to find the links. I would have liked to have the message to pop-up next to the mouse, but that isn’t very hard to do.
Not working on safari(4)?… atleast not here =/
nevermind =D its working again…
Do you guys have any idea why it isn’t working in Safari ?
– even the demo from chris isn’t at the moment…
Safari 3.1.2 (no extras)
Thanks in advance, Patte.
It is not working on Google Chrome and IE too