Last month, designer Helen Tran asked people to name five women designers that they thought were valuable to the industry:
I need you to help me out.
Name five female Designers you think are really valuable + important to our industry.— Helen Tran (@tranhelen) April 26, 2017
In just a few days, the tweet generated over 373 replies that named 636 women by their Twitter usernames specifically. A few people were joking around that the thread was a great place to find potential recruits and I realized I had a different need: I’m not trying to recruit anyone but I’d love to find women to follow who are excelling at things that I’m interested in or trying to learn more about. Since many people put their job title or area of expertise in their Twitter descriptions, I realized I could create a self-reported filtering system by searching each description for keywords and then display the profiles in a sortable directory.

I decided to use the thread as a jumping off point and create a free-standing website: Women Who Design. Here’s how I built it.
Getting Started
To start, I needed to:
- Record each person’s Twitter username, also known as their “handle,” from the original thread on a list.
- Set up the project’s file structure.
- Get the Twitter REST API to return profile information from a given handle.
- Choose a database to store each handle and its corresponding profile information.
The first step, getting the handles, was the easiest. With a good playlist on in the background, I spent about an hour combing the Twitter thread and entered each handle into a spreadsheet, which I then exported as a JSON file called `designers.json`.
At this point, I initialized my git repo and set up a basic file structure:
- index.html
- app.js
- styles.css
- designers.json
At the top of my `app.js` file, I imported all the designers from the original Twitter thread.
var designers = require('./designers.json'); Next up, I registered my app with Twitter to start working with the REST API.
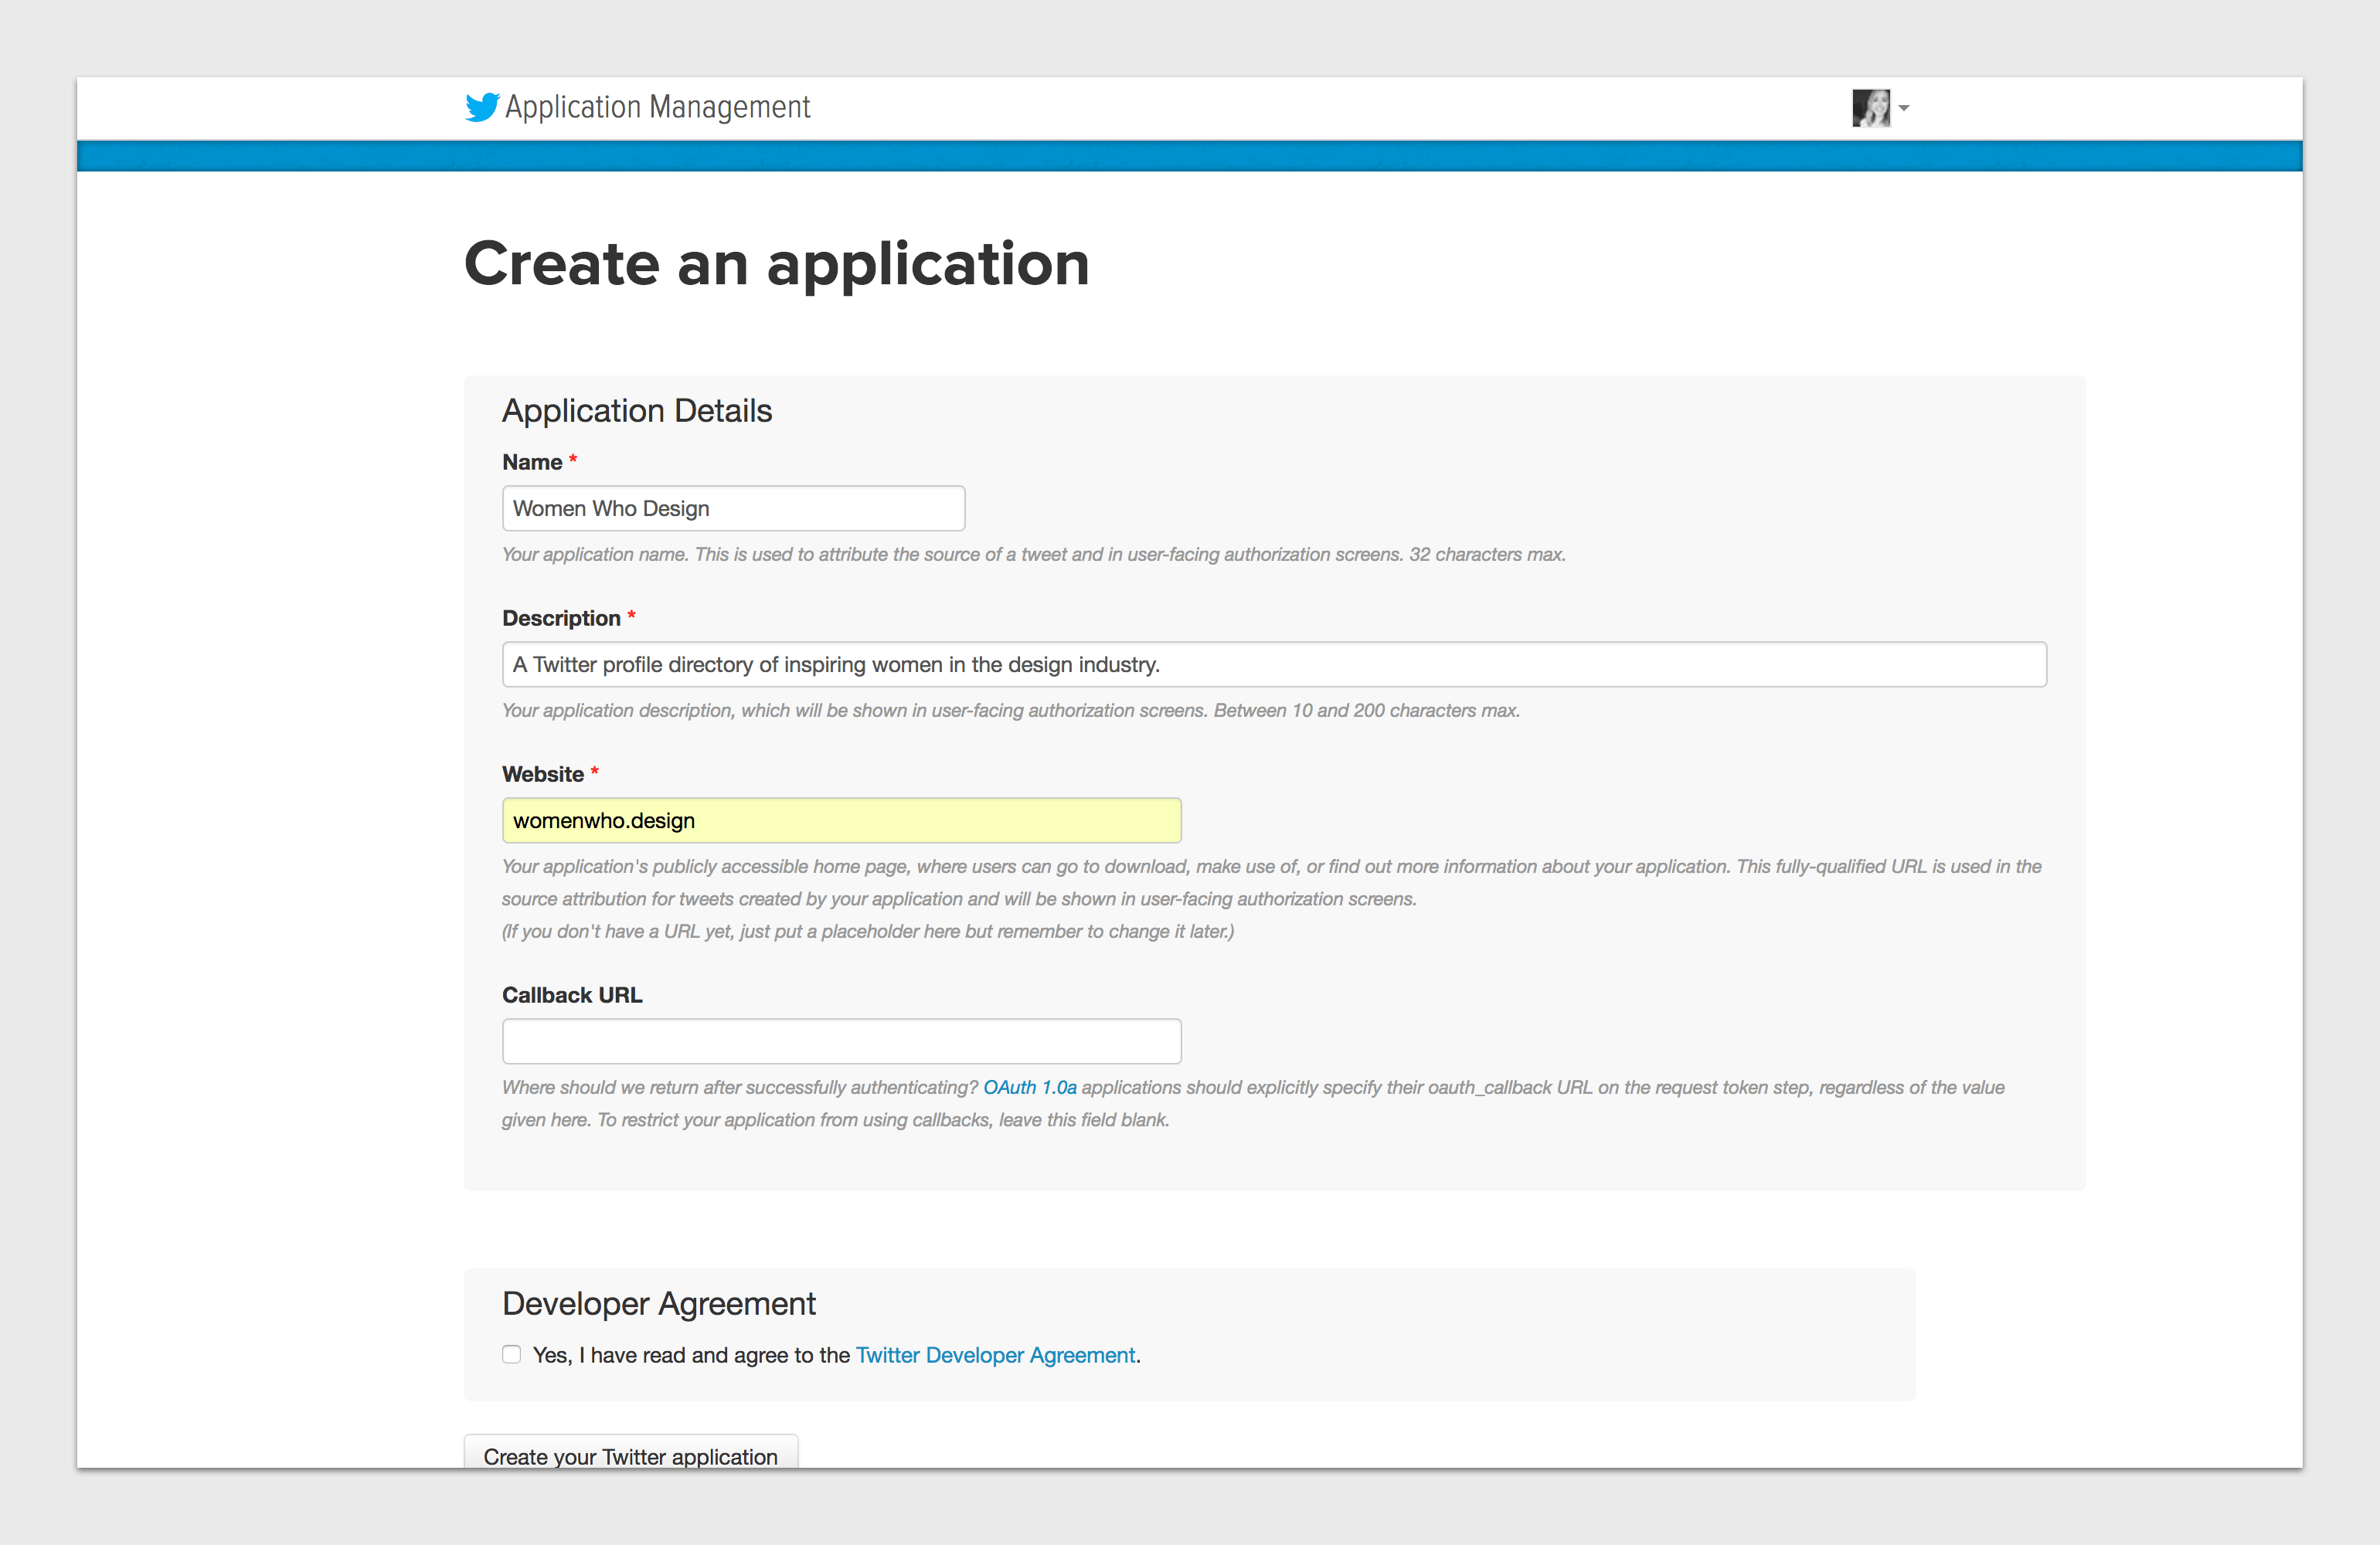
I chose to configure the project as a read-only application since I was only planning to make use of the GET users/show endpoint, which supplies user profile information.

Then I installed an asynchronous client library for Twitter (also called Twitter) through the command line to enable me to make calls to the API.
npm install twitterTo use the library in my project, I also had to require it at the top of my `app.js` file.
var twitter = require('twitter');According to the client library documentation, I would need to enter my app’s consumer key, consumer secret and a bearer token in my `.js` file after requiring "twitter".
var client = new Twitter({
  consumer_key: '',
  consumer_secret: '',
  bearer_token: ''
});
The key and secret were easily found in my Twitter app dashboard, but the bearer token required an extra step. I ran the following command in the command line to get the bearer token, filling in the variables with my credentials from the dashboard, then I added the result to the client variable above.
curl -u "$CONSUMER_KEY:$CONSUMER_SECRET" \
    --data 'grant_type=client_credentials' \
    'https://api.twitter.com/oauth2/token'
The client library also provided a handy convenience method for making requests, so I added it to my app.js file with a note to fill it in later. According to the GET users/show endpoint documentation, I would need to pass each handle from my list to the "screen_name" parameter to get the profile information I was looking for.
client.get('users/show', {'screen_name': handle}, function(error, response) {
  if (!error) {
    console.log(response);
    // do stuff here later!
  }
});
If done correctly, I could expect the response to look something like this:
{
  "id": 2244994945,
  "id_str": "2244994945",
  "name": "TwitterDev",
  "screen_name": "TwitterDev",
  "location": "Internet",
  "profile_location": null,
  "description": "...",
Finally, I had to choose a database to store the profiles. I landed on the Realtime Database from Firebase, because it’s a NoSQL database that uses JSON as its storage format. I installed firebase and firebase-admin on npm, then required them at the top of my `app.js` file alongside everything else.
var firebase = require('firebase');
var admin = require('firebase-admin');
To get writing to and reading from the database working, I had to authenticate Firebase using a specially generated “Service Account” private key. I generated the key in the Service Accounts tab of my Firebase settings, and dropped the corresponding code below the rest of my configurations.
var serviceAccount = {
  "type": "service_account",
  "project_id": process.env.WWD_FIREBASE_PROJECT_ID,
  "private_key_id": process.env.WWD_FIREBASE_PRIVATE_KEY_ID,
  "private_key": process.env.WWD_FIREBASE_PRIVATE_KEY,
  "client_email": process.env.WWD_FIREBASE_CLIENT_EMAIL,
  "client_id": process.env.WWD_FIREBASE_CLIENT_ID,
  "auth_uri": "https://accounts.google.com/o/oauth2/auth",
  "token_uri": "https://accounts.google.com/o/oauth2/token",
  "auth_provider_x509_cert_url": "https://www.googleapis.com/oauth2/v1/certs",
  "client_x509_cert_url": process.env.WWD_FIREBASE_CLIENT_CERT_URL
};
Working with the data
Phew! List recorded: check. App registered: check. File structure set up: check. Database setup: check. Time to actually start using the API.
I took a look at the sample response in the GET users/show endpoint documentation and I determined I’d need to store the user’s name, handle (referred to in the docs as screen_name), location, description, and profile image URL. I also wanted to save the profile color each user set on Twitter to use as a highlight color for buttons, links, and other accents, so I put the following code inside the client library convenience method I had saved in my `app.js` file.
var name = response.name;
var handle = response.screen_name;
var description = response.description;
var imageUrl = response.profile_image_url_https;
var location = response.location;
var profileColor = response.profileColor;
To prevent situations where differences in capitalization would result in two instances of the same profile (like @julesforrest vs @JulesForrest), I set the handle variable to lowercase.
handle = handle.toLowerCase();Then I noticed the profile images being returned were way too small to be useful on a desktop display. By tinkering with the image URL, I found a larger image path that worked better for my needs.
imageUrl = response.profile_image_url_https.replace("_normal", "_400x400");Linking the Links
People often have URLs, @handles, #hashtags and email addresses in their profile descriptions, but unfortunately, the Twitter API was returning each description as a simple string. Luckily, I found a tool called Autolinker that would search each string and build out anchor tags in the appropriate places.
To get it working, I installed it via npm, then required it at the top of my app.js file:
npm install autolinker --savevar Autolinker = require( 'autolinker' );Basic usage looked pretty straightforward and it came with a few options out of the box that could be passed as an object to the second parameter, like opening each link in a new window or adding a class to each anchor tag.
var linkedText = Autolinker.link( textToAutolink[, options] );However, I wanted to add each user’s custom profile color (saved earlier from the API response) as an inline style on that user’s links, which required writing a custom replacement function. While custom replacement functions can handle some pretty complex configurations, I only tweaked the example from the documentation slightly to add the inline color styles and open each link in a new window. It’s important to note the social network for mentions and hashtags needs to be specified at the top of object parameter to link them properly, which wasn’t immediately clear from the docs.
description = Autolinker.link( description, {
  mention: 'twitter',
  hashtag: 'twitter',
  replaceFn : function( match ) {
    switch( match.getType() ) {
      case 'url' :
        var tag = match.buildTag();
        tag.setAttr( 'style', 'color: #' + profileColor );
        return tag;
      case 'mention' :
        var mention = match.getMention();
        return `<a href="https://twitter.com/${mention}" target="blank" style="color: #${profileColor}">@${mention}</a>`;
      case 'email' :
        var email = match.getEmail();
        return `<a href="mailto:"${email}" target="blank" style="color: #${profileColor}">${email}</a>`;
      case 'hashtag' :
        var hashtag = match.getHashtag();
        return `<a href="https://twitter.com/hashtag/${hashtag}" target="blank" style="color: #${profileColor}">#${hashtag}</a>`;
      }
   }
});
Frustratingly, though, Twitter’s link-shortened t.co URLs were showing up as the text of the anchor tag instead of the descriptive URL.
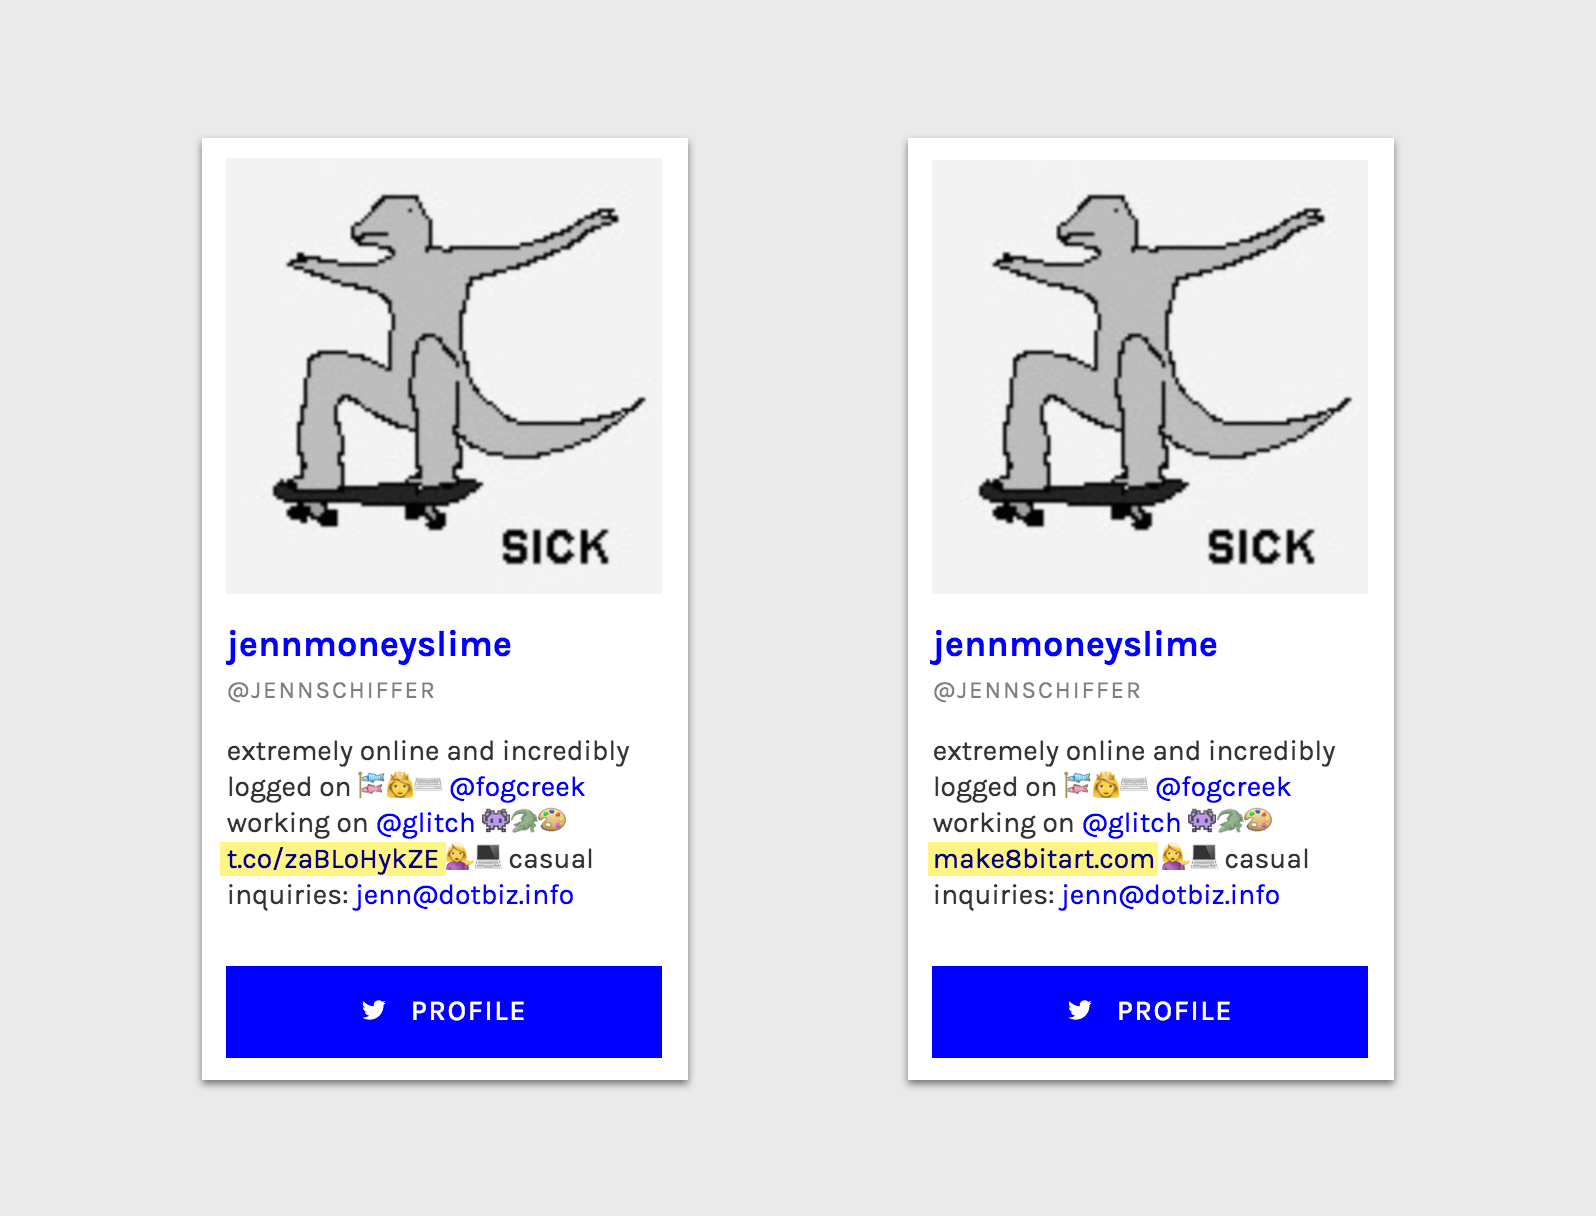
Several hours of debugging later, I finally noticed that the t.co URLs and not the descriptive URLs were in the original strings returned by the API all along. After re-examining the sample response, I found a description.urls object that I had missed earlier and logged that as well, replacing the t.co URL text with the appropriate descriptive URL text.
var descriptionUrls = response.entities.description.urls;
if (descriptionUrls.length != 0) {
  for (var i = 0; i < descriptionUrls.length; ++i) {
    description = description.replace(descriptionUrls[i].url, `${descriptionUrls[i].display_url}`);
  }
}
Searching for Filters
People get the most of Twitter when they’re following people who are relevant to them in some way, so it had to be easy for directory users to sort the profiles by position or area of expertise. For example, as someone who’s interested in front-end development, I’d like to find which women in the directory identified themselves as developers.

Adding those sortable filters was the last and most important step to complete before writing each profile to Firebase and I spent a lot of time thinking about the right way to handle the problem. I knew I could create a self-reported filtering system by searching each profile description for keywords, but many of the terms people had in their descriptions overlapped with one another (product designer and UX designer, developer, and engineer). Ultimately, I decided that it was important to use the exact terms people used to describe themselves, even if it meant more clicks for the directory user.
To choose the filter categories, I looked for terms that showed up most frequently across the descriptions as a whole and wrote a function to search for terms and push appropriate tags to an array. I planned to later use the array on the front end to make the filtering work.
var designerTagsArray = [];
function addDesignerTags(handle, searchTerm, tag) {
  if ((description.toUpperCase()).includes(searchTerm) === true) {
    designerTagsArray.push(tag);
  };
};

addDesignerTags(handle, "PRODUCT DESIGN", "product ");
addDesignerTags(handle, "LEAD ", "lead ");
addDesignerTags(handle, "MANAGER", "manager ");
// etc, etc
For certain terms like “director”, I had to do a custom search to weed out similar phrases with significantly different meanings like art director or creative director.
if ((description.toUpperCase()).includes("DIRECTOR") === true) {
  if ((description.toUpperCase()).includes("ART DIRECTOR") === true) {
    // do nothing
  } else if ((description.toUpperCase()).includes("CREATIVE DIRECTOR") === true) {
    // do nothing
  }
  else {
    designerTagsArray.push("director");
  };
};
When the filtering was done, I stringified the array and removed any extra characters:
designerTagsArray = JSON.stringify(designerTagsArray);
designerTagsArray = designerTagsArray.replace(/[^\w\s]/gi, '');
Writing to Firebase
It was time to upload all the data from the original list. First, I created a new object to hold all the information I needed to write to Firebase:
var designerProfile = new Object();Assigned all items:
designerProfile.name = name;
designerProfile.handle = handle;
designerProfile.description = description;
designerProfile.imageUrl = imageUrl;
designerProfile.imageUrlMobile = imageUrlMobile;
designerProfile.profileColor = profileColor;
designerProfile.designerTags = designerTagsArray;
And wrote a function to add them to an object I named display on Firebase:
function writeToFirebase(handle, designerProfile) {
  firebase.database().ref('display/' + handle).set({
    designerProfile
  });
  console.log(handle + " has been written to Firebase!");
};
writeToFirebase(handle, designerProfile);
Up until this point, all the code I had written was contained inside the original convenience method from the Twitter client library:
client.get('users/show', {'screen_name': handle}, function(error, response) {
  if (!error) {
    console.log(response);
    // log relevant data
    // lowercase handle
    // adjust image URL
    // add links to descriptions
    // search and add tags
    // write to Firebase
  }
});
I wrapped the convenience method inside a function called getProfileInfo, which accepted a Twitter handle as a parameter.
var getProfileInfo = function(handle) {
  client.get('users/show', {'screen_name': handle}, function(error, response) {
    if (!error) {
      console.log(response);
      // log relevant data
      // lowercase handle
      // adjust image URL
      // add links to descriptions
      // search for tags
      // write to Firebase
    }
  });
};
Then I wrote a loop to cycle through each handle from the JSON file of the original list, which I’d imported earlier to the top of my app.js file.
for (var i = 0; i < designers.length; ++i) {
  getProfileInfo(designers[i].handle);
};
Finally, I ran the script in the command line using Node and got all the profile data showing up in Firebase.
node app.js
The Front End
While ironing out the data kinks, I was also working on a simple front-end that read profiles from the database and built them out in HTML using jQuery. I created about and nomination pages as well, with a form on the nomination page to capture new submissions.

To get the form working, I grabbed the inputted text from each of the input fields and added them to a new Firebase object I named submit for later review.
var designerDatabase = firebase.database();
$('#designer-submission').submit(function(event){
  event.preventDefault();
  var handle = $('#handle').val();
  var reason = $('#reason').val();
  designerDatabase.ref('submissions/' + handle).set({
    handle: handle,
    reason: reason
  });
  $('#handle').val('');
  $('#reason').val('');
});
All in all, I ended up with a client-side `.js` file, three `.html` files, a logo `.svg` file and a `.css` file.
Getting it Live
When the basic interactions were all coded, I decided it was time to try getting the project up on Heroku. Since most of the app was built on server-side Node, I needed a tool called Express.js to publish it as an actual site. To do that, I had to set up my `package.json` file.
npm init
After asking a bunch of questions about the name and version number of my app, it prompted me to specify an entry point, which I left as the default: index.js.
entry point: (index.js)Then I installed Express:
npm install express --saveAfter that, I set up my index.js file, which looked like this:
var express = require('express');
var app = express();

app.use(express.static('public'));

app.get('/', function (req, res) {
  res.sendFile('index.html');
});

app.listen(process.env.PORT || 3000, function () {
  console.log('Example app listening on port 3000!');
});
To serve all my client-side files properly, I moved them all to a folder called public. I set up a remote Heroku repo and pushed the code.
git push heroku masterAdjusting the back-end structure
Once everything else was up and running, I had to change my setup a bit because I wanted to use the getProfileInfo function to both refresh existing profiles and write entirely new profiles for designers submitted through the site.
I nixed my app.js file and saved the getProfileInfo function as a module.export called getprofileinfo.js<code> to use in two newly created scripts: display.js and submit.js. Then I required the module at the top of the display script and used the Heroku scheduler add-on to run it every 24 hours to refresh the data of existing profiles on Firebase.
var getProfileInfo = require('./getprofileinfo.js');
function getDisplayedDesigners() {
  firebase.database().ref('display/').on('value', function (results) {
    var allDisplayedDesigners = results.val();
    for (var designer in allDisplayedDesigners) {
      getProfileInfo(designer);
    };
  });
}

getDisplayedDesigners();
The submit script was a little different. I wanted to browse the submissions manually to remove any troll responses or ineligible people, then automatically add the remaining submissions to the display object and remove them from the submit object. I also had to account for people who might include the @ symbol in the handle field of the form when submitting.
var getProfileInfo = require('./getprofileinfo.js');
function getSubmittedDesigners() {
  firebase.database().ref('submissions/').on('value', function (results) {
    var allSubmittedDesigners = results.val();
    for (var designer in allSubmittedDesigners) {
      var handle = designer;
      if (handle.includes("@") === true) {
        handle = handle.replace("@", "");
        getProfileInfo(handle);
        firebase.database().ref('submissions/' + "@" + handle).remove();
      } else {
        getProfileInfo(handle);
        firebase.database().ref('submissions/' + handle).remove();
      };
    };
  });
}

getSubmittedDesigners();
With this setup, I could run the submit.js in the command line and process all the eligible submissions at once.
node submit.jsLaunch!
On May 15, I officially launched my first-ever app: Women Who Design. In the first 24 hours, it got 15,000 visitors and 1,000 new nominations, which was pretty exciting to see. I hadn’t anticipated that kind of response, though, so I’m now working on some major front-end and performance upgrades to support the site traffic and volume of profiles. In the meantime, I’m glad that people are using the site to find and nominate incredibly talented women in the design industry. Stay tuned!

Thanks for writing this up! Can’t wait to see what’s next.
Jules this is such a crappy comment, but awesome work on this post. I’m just dabbling in setting up the basics of a progressive web app using this kind of thing and the steps and detail that you’ve gone through have made me realised I was approaching things in the totally wrong way.
I’d love to see a follow-up on the improvements of the performance side of things as well.
I’d also like to see what performance improvements you made. Thanks for taking the time for the great write-up!
This is just awesome, great work Jules! This really shows you how easy it is to build a web app yourself.
Sometimes (most of the time?) the simplest ideas are the best! It was a fantastic idea and well executed, thanks or the descriptive write up!
Hey Jules, thanks so much for writing this. I just followed your tutorial (admittedly, not all the way), and finally built my first node app with Firebase!
This is an inferior, but inspired, version of the site you made: https://designers-who-code.herokuapp.com/
Thanks for this!
I just have a question about Autolinker: I came across a weird bug where the mention/hashtag links no longer get autolinked if I added the replaceFn method. Weird, huh?
Whoa, looks awesome Andric. Glad you found the tutorial helpful. Take a look at the Autolinker section again, it’s been updated :)
Hope that fixes the problem!
Thanks for this awesome write up Jules. It really helped me connect a lot of the dots!