Static Site Website Generators have been getting increasingly popular within the last 2 years. Much has been written (like this and this) and there have been many great open source projects and even funded companies launched to help you get up and running.
What if I told you that you could build a Static Site Generator with your own custom CMS without the need for a database? Not just that, but we can get to Hello World! in under 100 lines of JavaScript.
Article Series:
- Build a Custom CMS for a Serverless Static Site Generator (You are here!) + Repo
- Build a Custom Serverless CMS: Part 2 + Repo
The historic problem with static site generators is that they typically require content to be authored in markdown. This works great for developers but not as well for clients who are used to working in a CMS authoring environment. Creating such an environment has traditionally meant the need to create a database to manage authentication, save content and upload media.
Thanks to the rise of so-called serverless architectures (aka Backend as a Service), this is no longer the case.
In this demo, we will create the bare bones of a static site generator with content authored by an admin user via a standard web form (no database necessary).
To accomplish this, we will use:
- A serverless web application architecture (AWS SDK for JavaScript, Amazon Cognito, IAM and S3)
- A front end template engine (JSRender).
View the completed files for this proof-of-concept demo project on GitHub.
Set Up a Static Website on Amazon S3
First, sign up for an account with Amazon Web Services (AWS) if you have not already. Once you have an AWS account it is easy to set up a static site hosted on AWS Simple Storage Service (S3).
First, create a bucket and then under Static Website Hosting in Properties, select Enable website hosting and set the Index Document to point to the homepage of the site (`index.html`).
Next, create a bucket policy to make your site publicly readable. For information on setting up bucket permissions, refer to the AWS S3 documentation. Additionally, we need a policy that will allow an admin to save content edits.
<?xml version="1.0" encoding="UTF-8"?>
  <CORSConfiguration xmlns="http://s3.amazonaws.com/doc/2006-03-01/">
    <CORSRule>
      <AllowedOrigin>*</AllowedOrigin>
      <AllowedMethod>POST</AllowedMethod>
      <AllowedMethod>GET</AllowedMethod>
      <AllowedMethod>PUT</AllowedMethod>
      <AllowedMethod>DELETE</AllowedMethod>
      <AllowedMethod>HEAD</AllowedMethod>
      <AllowedHeader>*</AllowedHeader>
    </CORSRule>
  </CORSConfiguration>
For more detailed information on how to host a static site on S3, including on one of your own domains, refer to Hosting a Static Website on Amazon Web Services.
Create Static Site Files
Create a new directory for your project. Construct a simple project page or pick a simple example from your front end framework of choice. In our demo, we use the Jumbotron example from Bootstrap.
Upload the files to the S3 bucket you created. Once the upload is complete, select the S3 bucket and view Properties. Click on the endpoint link and you will be able to view your site.
Create Admin Login
Amazon Cognito provides a simple way to add an authentication flow to a website.
The first step in this process is to create a UserPool. In the AWS Console, navigate to Amazon Cognito and create a user pool with the default settings. Read more about User Pools in the AWS Documentation.
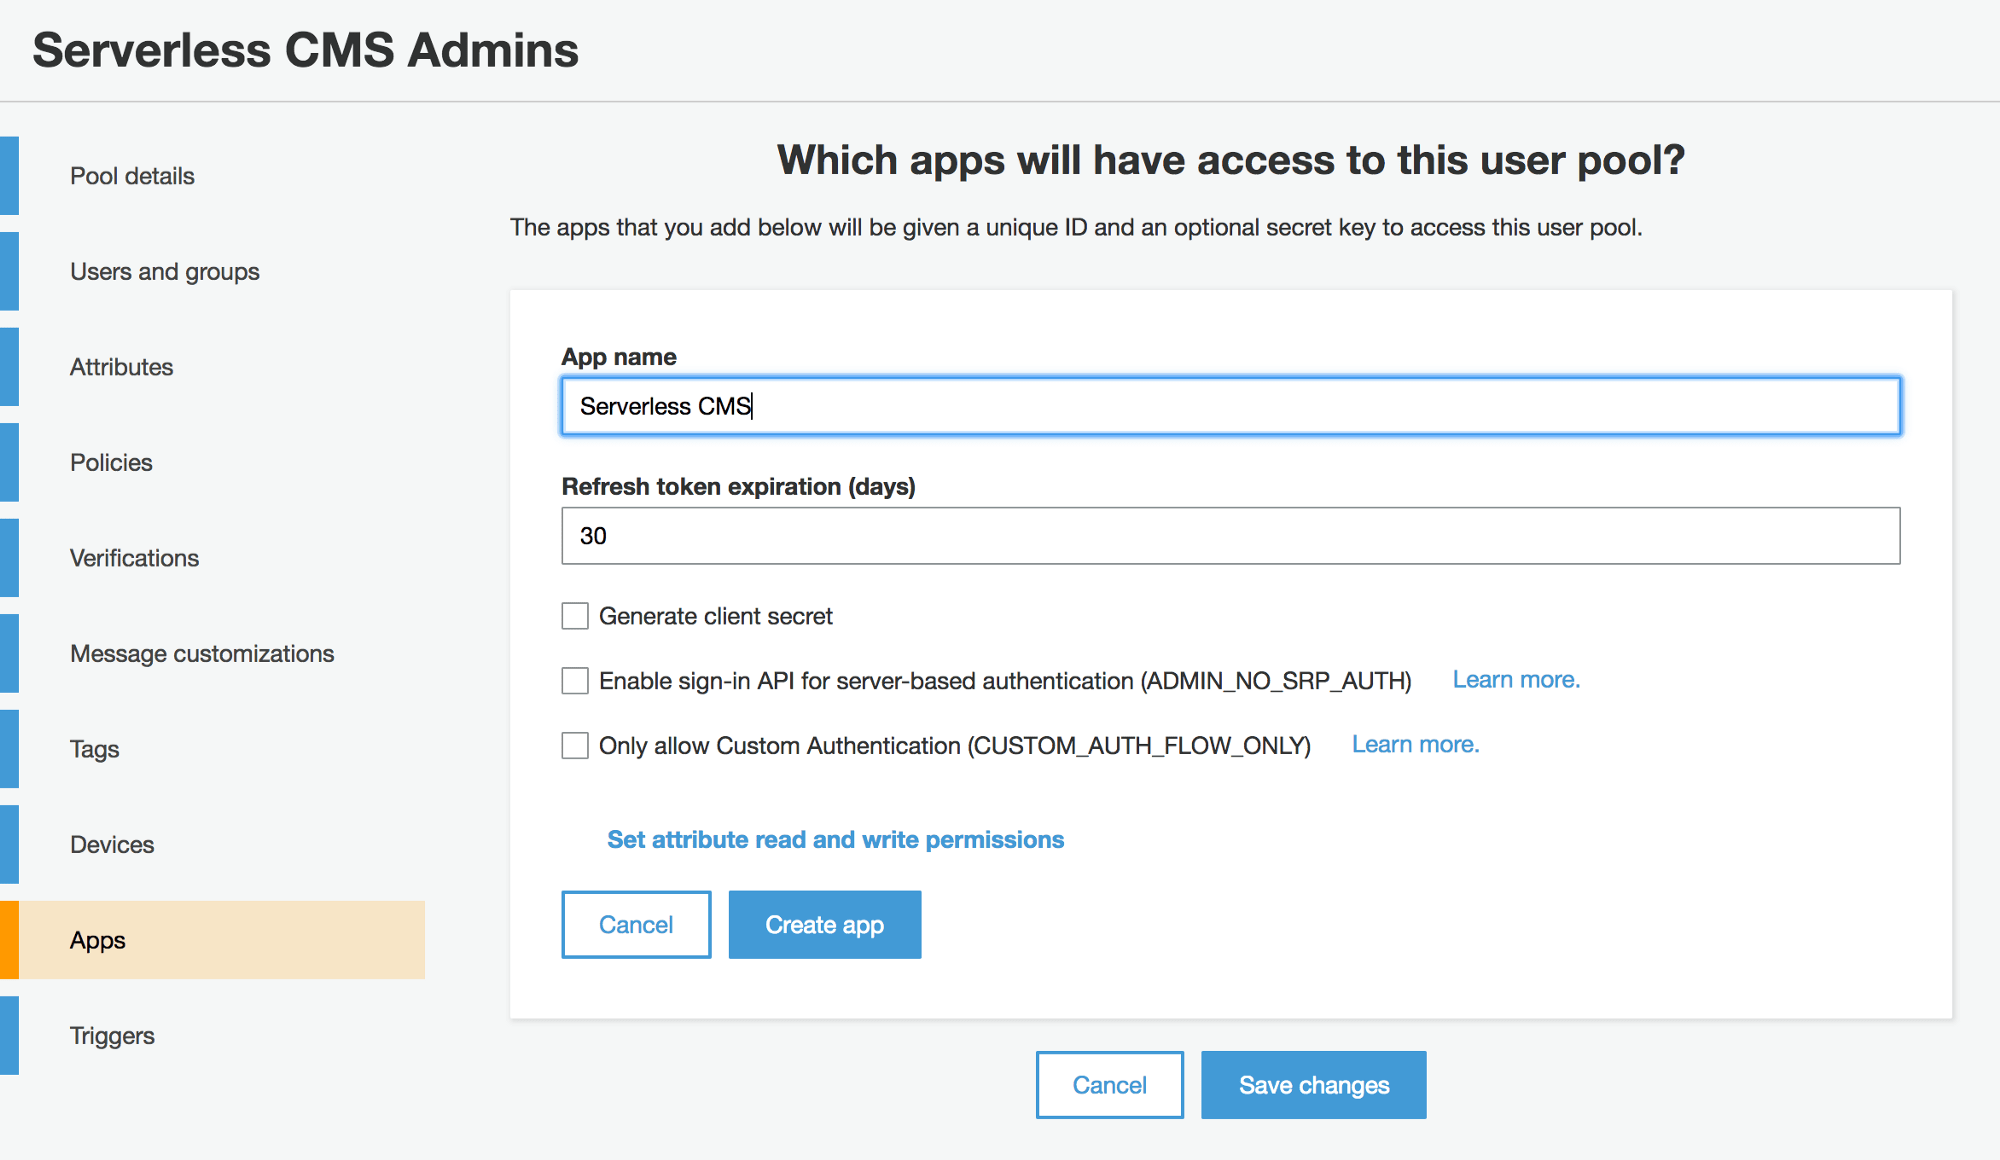
Once your User Pool is created, you need to add an app with access to the pool. Select your User Pool to edit it, then select the Apps tab. Click the Add an app button and give your app a name. When adding an app, it is very important to uncheck the Generate client secret checkbox because the JavaScript in the Browser SDK does not support apps with a client secret.
We will directly create our admin users in the AWS Console, then provide them with credentials they can use to log in. Only these users will be able to get authenticated to have access to generate the static content for our site.
Go into the User Pool and select Users and Groups. Fill in your own information so you can be the first admin user. Select the option to send an invitation to the user via email.

Now we need to create a login page for our admins. Make a new admin directory in the project with an index.html with a login form inside it. In our demo, we use the Bootstrap Sign In Page.
To connect our form with Cognito, we will need to use the Amazon Cognito Identity SDK for JavaScript. Follow the installation instructions on the project page to add the scripts to our login page.
Next, use the Amazon Cognito Identity service to authenticate and establish a session for our admin user with the temporary password received via email.
Add a submit event listener to our login form that calls a login function based on the authentication example from the Amazon Cognito Identity SDK for JavaScript Project Page.
$('.form-signin').on('submit', function(e) {

  e.preventDefault();

  var authenticationData = {
    Username : $('#inputUsername').val(),
    Password : $('#inputPassword').val()
  };
  var authenticationDetails = new AWSCognito.CognitoIdentityServiceProvider.AuthenticationDetails(authenticationData);
  var poolData = {
    UserPoolId : '...', // your user pool id here
    ClientId : '...' // your client id here
  };
  var userPool = new AWSCognito.CognitoIdentityServiceProvider.CognitoUserPool(poolData);
  var userData = {
    Username : $('#inputUsername').val(),
    Pool : userPool
  };

  cognitoUser = new AWSCognito.CognitoIdentityServiceProvider.CognitoUser(userData);
  cognitoUser.authenticateUser(authenticationDetails, {
    newPasswordRequired: function(userAttributes, requiredAttributes) {
      $('#form-password').removeAttr('hidden');
      $('#form-login').css('display', 'none');
      if ($('#inputNewPassword').val() !== '') {
        cognitoUser.completeNewPasswordChallenge($('#inputNewPassword').val(), [], this);
      }
    },
    onSuccess: function (result) {
      AWS.config.credentials = new AWS.CognitoIdentityCredentials({
        IdentityPoolId : 'us-east-1:XXXXXXXX-XXXX-XXXX-XXXX-XXXXXXXXXXXX',
        Logins : {
          'cognito-idp.us-east-1.amazonaws.com/us-east-1_XXXXXXXXX' : result.getIdToken().getJwtToken()
        }
      });
      $.getJSON('index.json', function(data) {
        $('.container').html($('#adminForm').render(data));
      }).fail(function() {
        $('.container').html($('#adminForm').render({}));
      });
      AWS.config.update({
        region: 'us-east-1',
        credentials: new AWS.CognitoIdentityCredentials({
          IdentityPoolId: 'us-east-1:XXXXXXXX-XXXX-XXXX-XXXX-XXXXXXXXXXXX',
          Logins: {
            'cognito-idp.us-east-1.amazonaws.com/us-east-1_XXXXXXXXX' : result.getIdToken().getJwtToken()
          }
        })
      });
      s3 = new AWS.S3({
        apiVersion: '2006-03-01',
        params: {
          Bucket: YOUR_BUCKET_NAME
        }
      )};
    },
    onFailure: function(err) {
      alert(err);
    }
  });
});
We need to create an additional form to allow the admin to create a password. Admin will sign in with their temporary password then set a new password to complete authentication.
For more information on working with Amazon Cognito and User Pools, refer to these articles:
- Amazon Cognito Developer Guide
- Accessing Your User Pools using the Amazon Cognito Identity SDK for JavaScript
- Customizing Amazon Cognito User Pool Authentication Flow
Create CMS Admin
With login complete, we want to allow our admin to edit content on the site. In this demo, we will edit the top jumbotron callout. After admin is authenticated, we display a form with inputs for site info, the callout headline, and text content.

When the form is submitted, we combine the data from the form with a template to generate static HTML. In this demo, we JSRender as our templating engine.
Create the template for our Jumbotron page by copying the HTML and embed it on our admin page as a JSX template. Replace the content with template tags mapped to the names of the admin edit form fields.
<script type="text/x-jsrender" id="jumbotronTemplate">
  <html lang="en">

  <head>
    <meta charset="utf-8">
    <meta http-equiv="X-UA-Compatible" content="IE=edge">
    <meta name="description" content="{{>siteDescription}}">
    <meta name="author" content="">
    <title>{{>siteTitle}}</title>
    <link href="css/bootstrap.min.css" rel="stylesheet">
    <link href="css/jumbotron.css" rel="stylesheet">
  </head>

  <body>
    <nav class="navbar navbar-static-top navbar-dark bg-inverse">
      <a class="navbar-brand" href="#">{{>siteTitle}}</a>
      <ul class="nav navbar-nav">
        <li class="nav-item active">
          <a class="nav-link" href="#">Home <span class="sr-only">(current)</span></a>
        </li>
        <li class="nav-item">
          <a class="nav-link" href="#">About</a>
        </li>
        <li class="nav-item">
          <a class="nav-link" href="#">Contact</a>
        </li>
      </ul>
    </nav>
    <div class="jumbotron">
      <div class="container">
        <h1 class="display-3">{{>calloutHeadline}}</h1>
        <p>{{>calloutText}}</p>
        <p>
          <a class="btn btn-primary btn-lg" href="#" role="button">Learn more »</a>
        </p>
      </div>
    </div>

    ...
Add an event listener to the edit form to capture the data entered as a JSON Object, then pass it to the JSRender template to generate HTML for uploading to S3 in the next step.
$('.container')
  .on('submit', '#form-admin',function(e) {
    e.preventDefault();
    var formData = {};
    var $formFields = $('#form-admin').find('input, textarea, select').not(':input[type=button],:input[type=submit],:input[type=reset]');
    $formFields.each(function() {
      formData[$(this).attr('name')] = $(this).val();
    });

    var jumbotronHTML = '<!DOCTYPE html>' + $('#jumbotronTemplate').render(formData);
    var file = new File([jumbotronHTML], 'index.html', {type: "text/html", lastModified: new Date()});
    ...
Save Static Site Files
Next, we grant permission to admin to save edits to S3 by creating an Identity and Access Management (IAM) role with a read/write policy for our S3 bucket.
Navigate to IAM in the AWS Console, and then select Policies. Create a new policy with the following Policy Document:
{
  "Version": "2012-10-17",
  "Statement": [ {
    "Effect": "Allow",
    "Action": [ "s3:*" ],
    "Resource": [ "arn:aws:s3:::BUCKET_NAME/*" ]
  } ]
}
Next select Roles, then create a new role and give it a name. Select Role for Identity Provider access then select Grant access to web identity providers. Use the default Policy Document for Verify Role Trust.

On the next step, attach the policy you just created for accessing the S3 bucket.
Once again select the Roles tab within the IAM section of the AWS Console. Select the role you just created. In Permissions, under Managed Policies you should see your policy for S3. If you do not, attach it now.

Update the AWS config settings on the admin page to include our S3 service.
// Instantiate AWS SDK service objects now that the credentials have been updated.
AWS.config.update({
  region: 'BUCKET_REGION',
  credentials: new AWS.CognitoIdentityCredentials({
    IdentityPoolId: 'IDENTITY_POOL_ID'
  })
});
s3 = new AWS.S3({
  apiVersion: '2006-03-01', params: {Bucket: 'BUCKET_NAME'}
});
The last step for connecting our admin user to S3 is to create an Identity Pool. Return to Amazon Cognito in the AWS Console and click the Manage Federated Identitites button, then the Create new identity pool button.
Give your pool a name then expand the Authentication providers section. Select the Amazon Cognito tab and enter your User Pool ID and App Client ID.

As you can see, in addition to Amazon Cognito you can use other authentication providers such as Facebook and Google. For more information, read Integrating User Pools with Amazon Cognito Identity.
Continue through the rest of the steps then under Sample Code, take note of the Identity Pool Id. Back on our admin page, when our form is submitted we will upload our HTML file to S3.
Additionally, once the HTML file has successfully uploaded, we create and upload a JSON file to store our data so when we return to the form it has the newly updated values filled in.
var file = new File([jumbotronHTML], 'index.html', { type: "text/html", lastModified: new Date() });
s3.upload({
  Key: 'index.html',
  Body: file,
  ACL: 'public-read',
  ContentDisposition: 'inline',
  ContentType: 'text/html'
}, function(err, data) {
  if (err) {
    return alert('There was an error: ', err.message);
  }
  file = new File([JSON.stringify(formData)], 'index.json');
  s3.upload({
    Key: 'admin/index.json',
    Body: file,
    ACL: 'public-read'
  }, function(err, data) {
    if (err) {
      return alert('There was an error: ', err.message);
    }
    $('#form-admin')
      .remove('#success')
      .prepend('<p id="success">Update successful! View Website</p>');
  });
});
Update Cognito’s authenticateUser onSuccess event handler to render the form as a template with values from the JSON file if it exists.
$.getJSON('index.json', function(data) {
  $('.container').html($('#adminForm').render(data));
}).fail(function() {
  $('.container').html($('#adminForm').render({}));
});
Next Steps
- Given the ability to generate and save static content to S3, there are many exciting possibilities for web content and admin interfaces that can be built.
- Add image and file uploading capabilities
- Add a rich text editor
- Improve the login functionality by adding forgot password and MFA.
- Build out the admin to edit components and content across multiple pages.
- Use contenteditable to allow logged-in admins to do in-page editing.
- Manage different user permissions levels with User Pool groups.
- Develop a workflow for building a custom CMS for each of your client projects.
- Create your own content management platform.

This is really, really cool! Never thought of using AWS authentication to save directly to S3 (and other stuff, like DynamoDB) from a statically-hosted admin interface. Just beautiful. You can even create a separate S3 bucket to store your HTML templates for the statically-hosted admin interface to use in building the pages.
How long until some of us come together and write NoServerPress, a content platform where both the admin and the resulting pages are completely statically hosted, and there are no servers to manage, no command line tools to run (*), just beautiful WYSIWYG website editing?
(* command line tools will probably still be the easiest way to build and deploy the HTML templates that the interface uses)
This is awesome. John’s a genius on a lot of fronts.
I’m definitely interested in making NoServerPress. =)
This looks really interesting. I hope you get time to do a couple of the next step items and continue this out a bit.
Thanks!
There is now an official Jekyll admin panel that does this for Jekyll…
It’s kinda awesome!
https://github.com/jekyll/jekyll-admin
Unless you host it live it doesn’t give the full abilities as the AWS service. With AWS you can do the same thing but live. So the same thing you write locally is the same thing that is in production for user interfaces and authentication.